Linux环境变量配置
在定制安装软件时,通常需要配置环境变量。下面列出了环境变量的不同配置方法。

Linux中读取环境变量的方法:
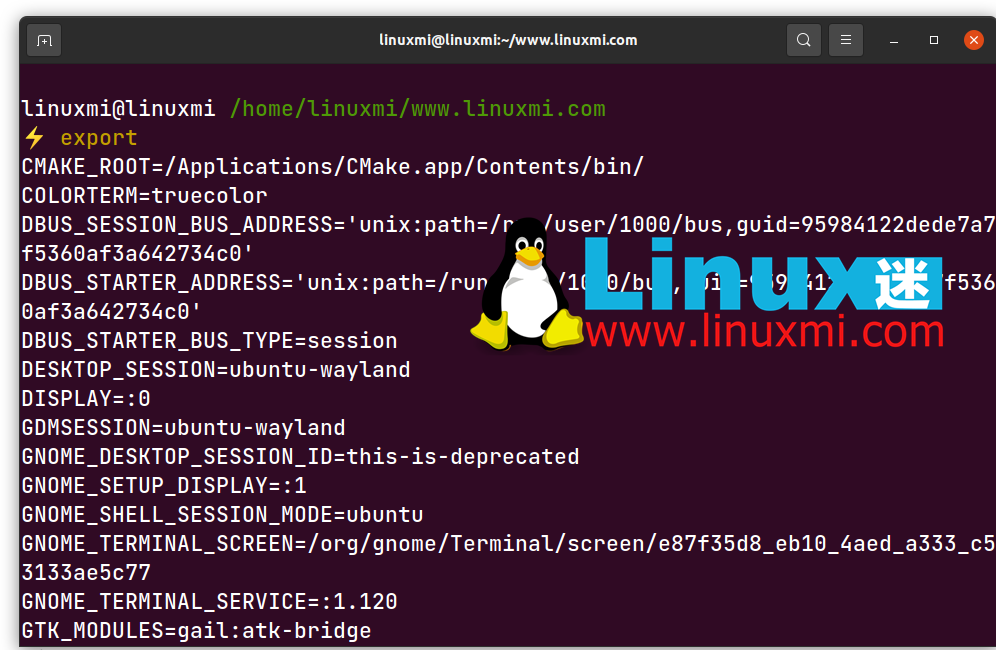
· 使用export命令可以显示当前系统定义的所有环境变量。
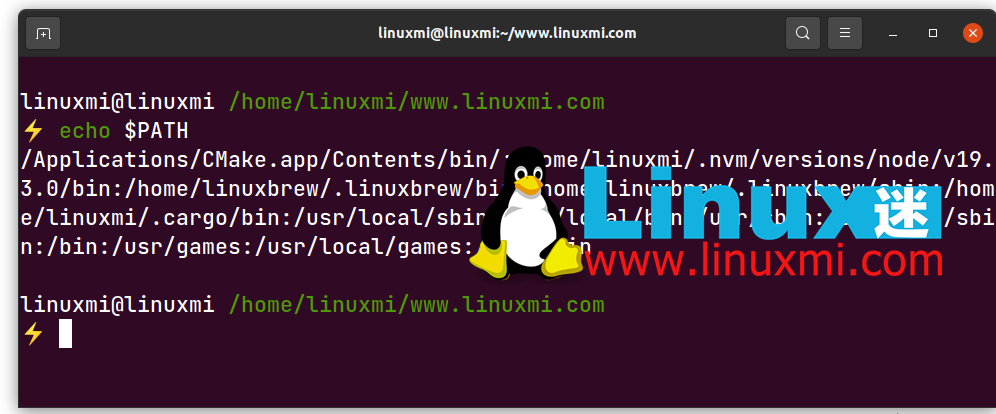
· 使用echo $PATH命令可以输出当前PATH环境变量的值。
这两个命令的作用如下:
export:
linuxmi@linuxmi /home/linuxmi/www.linuxmi.com

⚡ export

CMAKE_ROOT=/Applications/CMake.app/Contents/bin/
COLORTERM=truecolor
DBUS_SESSION_BUS_ADDRESS='unix:path=/run/user/1000/bus,guid=95984122dede7a7f5360af3a642734c0'

DBUS_STARTER_ADDRESS='unix:path=/run/user/1000/bus,guid=95984122dede7a7f5360af3a642734c0'

DBUS_STARTER_BUS_TYPE=session
DESKTOP_SESSION=ubuntu-wayland
DISPLAY=:0
GDMSESSION=ubuntu-wayland
GNOME_DESKTOP_SESSION_ID=this-is-deprecated
GNOME_SETUP_DISPLAY=:1
......
echo $PATH:
linuxmi@linuxmi /home/linuxmi/www.linuxmi.com

⚡ echo $PATH
/Applications/CMake.app/Contents/bin/:/home/linuxmi/.nvm/versions/node/v19.3.0/b
in:/home/linuxbrew/.linuxbrew/bin:/home/linuxbrew/.linuxbrew/sbin:/home/linuxmi/.c
argo/bin:/usr/local/sbin:/usr/local/bin:/usr/sbin:/usr/bin:/sbin:/bin:/usr/games:/us
r/local/games:/snap/bin
其中,PATH变量定义了运行命令的搜索路径,并使用冒号“:”分隔不同的路径。在使用export命令定义时,可以添加双引号或不添加。
Linux环境变量配置方法一:export PATH
使用export命令直接修改PATH的值,并增加JDK环境变量:
[root@k8s-node04 JDK]# pwd
/usr/local/JDK
[root@k8s-node04 JDK]# ll
total 4
drwxr-xr-x  9 root root  126 Sep  7 15:21 jdk-11.0.16
drwxr-xr-x. 7   10  143  245 Oct  6  2018 jdk1.8.0_191
-rwxrwxrwx. 1 root root 2277 Mar 15  2019 tomcat.keystore
[root@k8s-node04 JDK]#
[root@k8s-node04 JDK]# echo $PATH
/usr/local/sbin:/usr/local/bin:/usr/sbin:/usr/bin:/usr/local/JDK/jdk-11.0.16/bin:/root/bin
[root@k8s-node04 JDK]#
[root@k8s-node04 JDK]# export PATH=/usr/local/JDK/jdk1.8.0_191/bin:$PATH
[root@k8s-node04 JDK]#
[root@k8s-node04 JDK]# echo $PATH
/usr/local/JDK/jdk1.8.0_191/bin:/usr/local/sbin:/usr/local/bin:/usr/sbin:/usr/bin:/usr/
local/JDK/jdk-11.0.16/bin:/root/bin
注意事项:
· 生效时间:立即生效
· 生效期限:仅对当前终端有效,在窗口关闭后失效
· 生效范围:仅对当前用户有效
· 别忘了将原始配置,即$PATH部分,添加到已配置的环境变量中,以避免覆盖原始配置
Linux环境变量配置方法二:vim ~/.bashrc
通过修改用户目录下的~/.bashrc文件进行配置:
vim ~/.bashrc

# Add on the last line
export PATH=$PATH:/usr/local/JDK/jdk1.8.0_191/bin
注意事项:
· 生效时间:当同一用户打开新终端时生效,或手动执行source ~/.bashrc
· 生效期限:永久生效
· 生效范围:仅对当前用户有效
· 如果有后续的环境变量加载文件覆盖了PATH定义,可能会导致其失效
Linux环境变量配置方法三:vim ~/.bash_profile
与修改~/.bashrc文件类似,也需要在文件末尾添加新的路径:
vim ~/.bash_profile

# Add on the last line
export PATH=$PATH:/usr/local/JDK/jdk1.8.0_191/bin
注意事项:
· 生效时间:当同一用户打开新终端时生效,或手动执行source /.bash_profile
· 生效期限:永久生效 · 生效范围:仅对当前用户有效
· 如果没有/.bash_profile文件,可以编辑~/.profile文件或创建一个新文件
Linux环境变量配置方法四:vim /etc/bashrc
该方法是修改系统配置,需要管理员权限(例如root)或对文件的写入权限:
# If the /etc/bashrc file is not editable, it needs to be modified to be editable

chmod -v u+w /etc/bashrc

vim /etc/bashrc

# Add on the last line
export PATH=$PATH:/usr/local/JDK/jdk1.8.0_191/bin
注意事项:
· 生效时间:新开终端生效,或手动执行source /etc/bashrc生效
· 生效期限:永久生效
· 生效范围:对所有用户有效
Linux环境变量配置方法五:vim /etc/profile
该方法修改系统配置,需要管理员权限或对文件的写入权限,与vim /etc/bashrc类似:
# If the /etc/profile file is not editable, it needs to be modified to be editable

chmod -v u+w /etc/profile

vim /etc/profile

# Add on the last line
export PATH=$PATH:/usr/local/JDK/jdk1.8.0_191/bin
注意事项:
· 生效时间:新开终端生效,或手动执行source /etc/profile生效
· 生效期限:永久生效
· 生效范围:对所有用户有效
Linux环境变量配置方法六:vim /etc/environment
该方法是修改系统环境配置文件,需要管理员权限或对文件的写入权限:
# If the /etc/bashrc file is not editable, it needs to be modified to be editable

chmod -v u+w /etc/environment

vim /etc/environment

# Add on the last line
export PATH=$PATH:/usr/local/JDK/jdk1.8.0_191/bin
注意事项:
· 生效时间:新开终端生效,或手动执行source /etc/environment生效
· 生效期限:永久生效
· 生效范围:对所有用户有效
Linux环境变量加载原理分析
以上列举了环境变量的各种配置方法,那么Linux是如何加载这些配置的呢?它们的加载顺序是怎样的?
特定的加载顺序会导致同名环境变量定义被覆盖或无效。
环境变量的分类 环境变量可以简单地分为用户定义的环境变量和系统级别的环境变量。
-
用户级环境变量定义文件:/.bashrc、/.profile(有些系统是:~/.bash_profile) -
系统级环境变量定义文件:/etc/bashrc、/etc/profile(有些系统是:/etc/bash_profile)、/etc/environment
此外,在用户环境变量中,系统会先读取~/.bash_profile(或~/.profile)文件,如果没有这样的文件,它会读取~/.bash_login,然后根据这些文件的内容读取~/.bashrc。
如何测试Linux环境变量的加载顺序
为了测试不同文件的环境变量加载顺序,我们在每个环境变量定义文件的第一行定义相同的环境变量 UU_ORDER,其值将其自身的值连接到当前文件名后面。
需要修改的文件如下:
/etc/environment
/etc/profile
/etc/profile.d/test.sh,新建文件,无需跳过文件夹
/etc/bashrc,或/etc/bash.bashrc
/.bash_profile,或/.profile ~
/.bashrc
在每个文件的第一行添加以下代码,并根据当前文件的绝对文件名相应地修改冒号后面的内容。
export UU_ORDER="$UU_ORDER:~/.bash_profile"
修改完成后保存,打开一个新的窗口,然后使用echo $UU_ORDER命令观察变量的值:
linuxmi@ubuntu:~echoUU_ORDER
$UU_ORDER:/etc/environment:/etc/profile:/etc/bash.bashrc:/etc/profile.d/test.sh:~/.profile
:~/.bashrc
可以推断出,Linux 加载环境变量的顺序如下:
-
/etc/environment -
/etc/profile -
/etc/bash.bashrc -
/etc/profile.d/test.sh -
~/.profile -
~/.bashrc
Linux 环境变量文件加载详解 从以上测试中,可以很容易地得出 Linux 加载环境变量的顺序如下:
系统环境变量 -> 用户定义的环境变量 /etc/environment -> /etc/profile -> ~/.profile
打开 /etc/profile 文件,您会发现在文件代码中会加载 /etc/bash.bashrc 文件,然后检查 /etc/profile.d/ 目录中的 .sh 文件并加载它们。
# /etc/profile: system-wide .profile file for the Bourne shell (sh(1))
# and Bourne compatible shells (bash(1)
, ksh(1), ash(1), ...).

if [ "PS1" ]; then
  if [ "BASH" ] && [ "BASH" != "/bin/sh" ]; then
    # The file bash.bashrc already sets the default PS1.
    # PS1='\h:\w\$ '
    if [ -f /etc/bash.bashrc ]; then
      . /etc/bash.bashrc
    fi
  else
    if [ "`id -u`" -eq 0 ]; then
      PS1='# '
    else
      PS1=' '
    fi
  fi
fi

if [ -d /etc/profile.d ]; then
  for i in /etc/profile.d/*.sh; do
    if [ -r i ]; then
      .i
    fi
  done
  unset i
fi
接下来,打开~/.profile文件,您会发现文件中加载了~/.bashrc文件。
# if running bash
if [ -n "BASH_VERSION" ]; then
    # include .bashrc if it exists
    if [ -f "HOME/.bashrc" ]; then
    . "HOME/.bashrc"
    fi
fi

# set PATH so it includes user's private bin directories
PATH="HOME/bin:HOME/.local/bin:PATH"
接下来,打开 ~/.profile 文件,可以发现在该文件中加载了 ~/.bashrc 文件。
从 ~/.profile 文件中的代码中,不难发现当用户登录时,只会读取一次 /.profile 文件,而每次运行 Shell 脚本时,都会读取一次 ~/.bashrc。
一些小技巧:
你可以自定义一个环境变量文件,比如在某个项目下定义 uusama.profile,使用 export 定义一系列变量在该文件中,然后在 ~/.profile 文件后面添加 sourc uusama.profile,这样就可以在登录的 Shell 脚本中使用自己定义的一系列变量。
你也可以使用 alias 命令为一些命令定义别名,比如 alias rm=”rm -i”(需要使用双引号),并将该代码添加到 ~/.profile 中,这样每次使用 rm 命令时,就很方便地使用 rm -i 命令了。
以上就是良许教程网为各位朋友分享的Linu系统相关内容。想要了解更多Linux相关知识记得关注公众号“良许Linux”,或扫描下方二维码进行关注,更多干货等着你 !


 微信扫一扫打赏
 支付宝扫一扫打赏

.png)
