

HTTP/HTTPS如何自动加密上网?本篇文章重点为大家讲解一下HTTP/HTTPS自动加密上网具体方案,有需要的小伙伴可以参考一下。

方案介绍
涉及到的软件
-
BIND: 一个流行的域名解析服务器,我们可以设置哪些域名需要走加密线路。 -
Stunnel: 使用TLS对tcp协议进行加密,也就是对tcp建立一条加密线路。 -
SNI Proxy: 代理软件。对于HTTP协议,它可以根据Host请求头解析得出目标站IP;对于HTTPS协议,它可以根据SNI扩展中的域名解析得出目标站IP。
此方案优缺点
优点:
无需手动设置任何代理,就能够自动加密代理特定网站的HTTP或HTTPS协议
相对于我们常用的ssh隧道,ssh隧道是单路,而此方案是支持多并发连接,可以极大加速网站访问。
缺点:
对于代理HTTPS协议,需要发起HTTPS连接的客户端,比如浏览器支持TLS的SNI扩展。好消息是目前浏览器几乎都支持此扩展,但对于一些非浏览器的客户端,不支持SNI扩展。我们只能设置正向代理来解决此问题。
方案原理
流程图: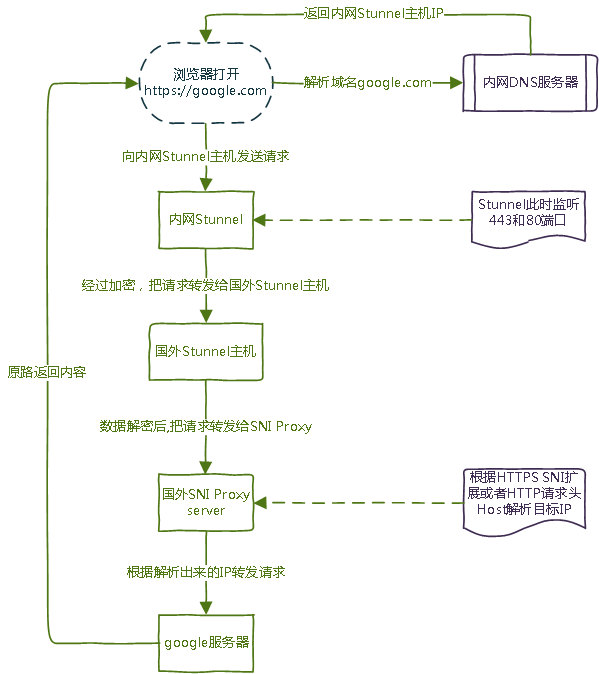
原理介绍:
1、首先我们需要准备三台服务器,一台是内网DNS服务器(安装bind),一台是内网代理服务器(安装stunnel),另一台国外服务器(安装stunnel,sniproxy)。
2、我们还需要设置DNS为内网的DNS,并在内网bind dns设置谷歌域名解析的IP为内网代理服务器
3、当我们访问谷歌网站时,首先会向内网DNS服务器发送DNS A记录查询,此时内网DNS服务器会返回内网代理服务器的IP。
4、浏览器得到谷歌域名的解析IP后(即内网代理服务器的IP),会向内网代理服务器发送HTTP或HTTPS请求。
5、此时内网代理服务器(即stunnel),会接收到请求,经过加密,把请求转发到国外服务器(stunnel)的指定端口上。
6、国外服务器(stunnel)接收到来自国内服务器(stunnel)的加密数据后,经过解密,把请求转发到sniproxy。
7、sniproxy再根据HTTP Host请求头或者HTTPS sni扩展的域名解析出谷歌服务器的IP,并把请求转发给谷歌服务器。
8、谷歌服务器收到来自sniproxy发送的请求后,马上返回网页内容给sniproxy,sniproxy再原路返回数据给浏览器。
方案实施
由于时间有限,我们仅在Ubuntu server 12.04演示安装。
环境介绍
系统:Ubuntu server 12.04
内网DNS IP: 10.96.153.201(主),10.96.153.204(从)
内网代理服务器: 10.96.153.204
国外服务器IP: 1.2.3.4
安装BIND9
1、在主DNS和从DNS安装bind,即10.96.153.201(主),10.96.153.204(从)。
    wget http://www.isc.org/downloads/file/bind-9-10-0b1-2/?version=tar.gz -O bind-9-10-0b1-2.tar.gz
    tar xzf bind-9-10-0b1-2.tar.gz
    cd bind-9-10-0b1-2
    ./configure --prefix=/usr/local/bind
    make && make install
2、配置主DNS服务器(10.96.153.201)
2.1、生成/usr/local/bind/etc/rndc.key密钥文件
/usr/local/bind/sbin/rndc-confgen -a -k rndckey -c /usr/local/bind/etc/rndc.key
2.2、编辑/usr/local/bind/etc/named.conf,写入如何内容:
    include "/usr/local/bind/etc/rndc.key";
    controls { inet 127.0.0.1 port 953 allow { 127.0.0.1; } keys { "rndckey"; }; };
    logging {
    channel default_syslog { syslog local2; severity notice; };
    channel audit_log { file "/var/log/bind.log"; severity notice; print-time yes; };
    category default { default_syslog; };
    category general { default_syslog; };
    category security { audit_log; default_syslog; };
    category config { default_syslog; };
    category resolver { audit_log; };
    category xfer-in { audit_log; };
    category xfer-out { audit_log; };
    category notify { audit_log; };
    category client { audit_log; };
    category network { audit_log; };
    category update { audit_log; };
    category queries { audit_log; };
    category lame-servers { audit_log; };
    };
    options {
        directory "/usr/local/bind/etc";
    pid-file "/usr/local/bind/var/run/bind.pid";
    transfer-format many-answers;
    interface-interval 0;
    forward only;
    forwarders { 202.96.128.166;202.96.134.133; };
    allow-query {any;};
    };
    zone "google.com" {
    type master;
    file "google.com.zone";
    allow-transfer { 10.96.153.204; };
    };
在这个named.conf文件中,我们只需要关心如下内容:
对于options{}区域,202.96.128.166和202.96.134.133这两个是ISP提供的本地DNS,需要修改为自己所在ISP的本地DNS。
对于zone “google.com”{}区域,这里定义了google.com域名的区域文件google.com.zone,还有允许10.96.153.204(即从DNS)同步区域文件。
2.3、建立google.com.zone区域文件:
    $TTL 3600
    @ IN SOA ns1.google.com. hostmaster.google.com. (
    2014072015  ; Serial
    3600 ; Refresh
    900 ; Retry
    3600000 ; Expire
    3600 ) ; Minimum
    @ IN NS ns1.google.com.
    @ IN NS ns2.google.com.
    ns1 IN A 10.96.153.201
    ns2 IN A 10.96.153.204
    @ IN A 10.96.153.204
    * IN A 10.96.153.204
对于这个区域文件:
ns1 IN A 10.96.153.201 指向第一个dns服务器,即主DNS。
ns2 IN A 10.96.153.204 指向第二个dns服务器,即从DNS。
@ IN A 10.96.153.204和* IN A 10.96.153.204指向内网的代理服务器(stunnel)。我们只需要修改这三个地方就好了。
3、配置从DNS服务器(10.96.153.204)
编辑named.conf,写入如下内容
    logging {
    channel default_syslog { syslog local2; severity notice; };
    channel audit_log { file "/var/log/bind.log"; severity notice; print-time yes; };
    category default { default_syslog; };
    category general { default_syslog; };
    category security { audit_log; default_syslog; };
    category config { default_syslog; };
    category resolver { audit_log; };
    category xfer-in { audit_log; };
    category xfer-out { audit_log; };
    category notify { audit_log; };
    category client { audit_log; };
    category network { audit_log; };
    category update { audit_log; };
    category queries { audit_log; };
    category lame-servers { audit_log; };
    };
    options {
        directory "/usr/local/bind/etc";
    pid-file "/usr/local/bind/var/run/bind.pid";
    transfer-format many-answers;
    interface-interval 0;
    forward only;
    forwarders { 202.96.128.166;202.96.134.133; };
    allow-query {any;};
    };

    zone "google.com" {
    type slave;
    file "google.com.zone";
    masters { 10.96.153.201; };
    };
配置从DNS就简单得多,只需要写入如上内容到named.conf文件。同样的,options{}中202.96.128.166和202.96.134.133这两个是当地ISP本地dns。zone “google.com”{}中10.96.153.201指明主DNS服务器IP。
4、启动bind dns服务器
/usr/local/bind/sbin/named
安装Stunnel
1、在内网代理服务器和国外主机安装stunnel
apt-get install stunnel4
2、内网代理服务器stunnel配置
编辑/etc/default/stunnel4,设置ENABLED=1。
    client = yes
    pid = /etc/stunnel/stunnel.pid
    [http]
    accept = 80
    connect = 1.2.3.4:8082

    [https]
    accept = 443
    connect = 1.2.3.4:4433
此配置文件表示,监听了80端口,并把此端口流量转发到1.2.3.4:8082,监听了443端口,并把此端口流量转发到1.2.3.4:4433
3、国外服务器stunnel配置
3.1、生成ssl证书stunnel.pem文件
    openssl genrsa -out key.pem 2048
    openssl req -new -x509 -key key.pem -out cert.pem -days 1095
    cat key.pem cert.pem >> /etc/stunnel/stunnel.pem
3.2、编辑/etc/stunnel/stunnel.conf文件
    client = no
    [http]
    accept = 1.2.3.4:8082
    connect = 127.0.0.1:8082
    cert = /etc/stunnel/stunnel.pem

    [https]
    accept = 1.2.3.4:4433
    connect = 127.0.0.1:4433
    cert = /etc/stunnel/stunnel.pem
此配置文件表示,监听了1.2.3.4:8082,并转发此地址流量到127.0.0.1:8082,监听了1.2.3.4:4433,并转发给地址流量到127.0.0.1:4433。
3.3、编辑/etc/default/stunnel4,设置ENABLED=1。
4、启动stunnel
service stunnel4 start
安装sniproxy
sniproxy项目地址:https://github.com/dlundquist/sniproxy
1、安装sniproxy
同样只演示在ubuntu server 12.04安装。
1.1、安装UDNS
    mkdir udns_packaging
    cd udns_packaging
    wget http://archive.ubuntu.com/ubuntu/pool/universe/u/udns/udns_0.4-1.dsc
    wget http://archive.ubuntu.com/ubuntu/pool/universe/u/udns/udns_0.4.orig.tar.gz
    wget http://archive.ubuntu.com/ubuntu/pool/universe/u/udns/udns_0.4-1.debian.tar.gz
    tar xfz udns_0.4.orig.tar.gz
    cd udns-0.4/
    tar xfz ../udns_0.4-1.debian.tar.gz
    dpkg-buildpackage
    cd ..
    dpkg -i *.deb
1.2、安装sniproxy
    apt-get install autotools-dev cdbs debhelper dh-autoreconf dpkg-dev gettext libev-dev libpcre3-dev libudns-dev pkg-config
    wget https://github.com/dlundquist/sniproxy/archive/master.zip
    unzip master.zip
    cd sniproxy-master/
    dpkg-buildpackage
    cd ..
    dpkg -i *.deb
2、配置sniproxy
/etc/sniproxy.conf内容如下:
    user daemon
    pidfile /var/run/sniproxy.pid
    error_log {
        syslog deamon
        priority notice
    }
    listen 127.0.0.1:8082 {
        proto http
        table http_hosts
    }
    table http_hosts {
            .*      *:80
    }

    listen 127.0.0.1:4433 {
        proto tls
        table https_hosts
    }
    table https_hosts {
    .* *:443
    }
此配置文件表示,监听了127.0.0.1:8082地址,并解析http协议中的Host请求头为IP,然后转发请求到此IP;监听了127.0.0.1:4433地址,并解析TLS中SNI扩展中的域名为IP,并转发请求到此IP。
3、启动sniproxy
sniproxy
结束
到目前为止,我们已经搭建完成了整套HTTP/HTTPS加密代理方案。方案中的HTTP明文协议,利用stunnel使用了TLS加密,变成了HTTPS协议,使得数据包无法被解析出明文。方案中的HTTPS协议,本身是加密的,但为了防止SNI扩展的中域名被嗅探,还是走了stunnel的加密通道。对于发送HTTPS请求而不支持SNI扩展的客户端,需要手动设置下代理。
以上就是良许教程网为各位朋友分享的Linu系统相关内容。想要了解更多Linux相关知识记得关注公众号“良许Linux”,或扫描下方二维码进行关注,更多干货等着你 !

 微信扫一扫打赏
 支付宝扫一扫打赏

.png)

.jpg)