

本篇文章重点为大家讲解一下ue3.x 通过jsplumb实现拖拽连线具体方法,有需要的小伙伴可以参考一下。
如果想在vue2里面使用jsplumb 可以查看 文章,下面讲解如何在vue3.x 里面使用jsplumb进行拖拽连线
1、安装
npm install --save jsplumb
2、引入
"ts" setup>
  import {ref, reactive,onMounted} from 'vue'
  import jsPlumb from 'jsplumb'
3、使用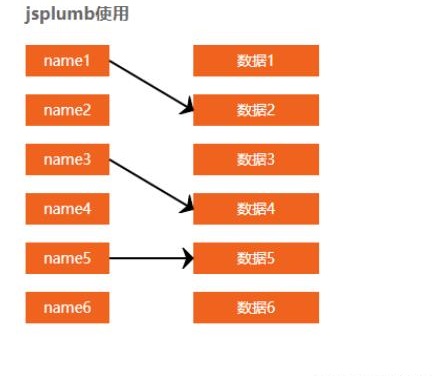
  jsplumb使用
  "container">
        "col1">
            "item in list1" :key="item.nodeId" :id="item.nodeId" name="joint">{{ item.name }}

        "col2">
            "item in list2" :key="item.nodeId" :id="item.nodeId" name="data">{{ item.name }}


"ts" setup>
  import {ref, reactive,onMounted} from 'vue'
  import jsPlumb from 'jsplumb'
    //jsplumb使用
    let $jsPlumb = jsPlumb.jsPlumb;
    let jsPlumb_instance = null; // 缓存实例化的jsplumb对象
    //模型轴
    const list1 = reactive([
        {name: "name1", nodeId: "name1", axis: '', type:''},
        {name: "name2", nodeId: "name2", axis: '', type:''},
        {name: "name3", nodeId: "name3", axis: '', type:''},
        {name: "name4", nodeId: "name4", axis: '', type:''},
        {name: "name5", nodeId: "name5", axis: '', type:''},
        {name: "name6", nodeId: "name6", axis: '', type:''}
    ]);
    //接口数据点
    const list2 = reactive([
        {name: '数据1', nodeId: 'data1'},
        {name: '数据2', nodeId: 'data2'},
        {name: '数据3', nodeId: 'data3'},
        {name: '数据4', nodeId: 'data4'},
        {name: '数据5', nodeId: 'data5'},
        {name: '数据6', nodeId: 'data6'}
    ]);

    onMounted(()=>{
        showPlumb();
    })

    const showPlumb = ()=> {
        jsPlumb_instance = $jsPlumb.getInstance({
            Container: 'container', // 选择器id
            EndpointStyle: {radius: 0.11, fill: '#fff'}, // 端点样式
            PaintStyle: {stroke: '#000', strokeWidth: 2}, // 绘画样式,默认8px线宽  #456
            HoverPaintStyle: {stroke: '#1E90FF'}, // 默认悬停样式  默认为null
            ConnectionOverlays: [ // 此处可以设置所有箭头的样式,因为我们要改变连接线的样式,故单独配置
                ['Arrow', { // 设置参数可以参考中文文档
                    location: 1,
                    length: 10,
                    paintStyle: {
                        stroke: '#000',
                        fill: '#000'
                    }
                }]
            ],
            Connector: ['Straight'], // 要使用的默认连接器的类型:直线,折线,曲线等
            DrapOptions: {cursor: 'crosshair', zIndex: 2000}
        },)

        console.log(jsPlumb_instance)

        jsPlumb_instance.batch(() => {

            for (let i = 0; i 'joint')
            }
            for (let i = 0; i 'data')
            }
        })

        const joint = document.getElementsByName('joint')
        const data = document.getElementsByName('data')

        jsPlumb_instance.setSourceEnabled(joint, true)
        jsPlumb_instance.setTargetEnabled(data, true)
        jsPlumb_instance.setDraggable(joint, false) // 是否支持拖拽
        jsPlumb_instance.setDraggable(data, false) // 是否支持拖拽

        jsPlumb_instance.bind('click',  (conn, originalEvent) => {
            jsPlumb_instance.deleteConnection(conn)
        })

    }

    // 初始化具体节点
    const initLeaf = (id, type)=> {
        const ins = jsPlumb_instance;
        const elem = document.getElementById(id)
        if (type == 'joint') {
            ins.makeSource(elem, {
                anchor: [1, 0.5, 0, 0], // 左 上 右 下
                allowLoopback: false,
                maxConnections: 1
            })
        } else {
            ins.makeTarget(elem, {
                anchor: [0, 0.5, 0, 0],
                allowLoopback: false,
                maxConnections: 1
            })
        }
    }


"less">
 #container {
    position: relative;
      margin-top: 20px;
      width: 100%;
      height: 300px;
  }

  .col2, .col1 {
      float: left;
      text-align: center;
  }

  .col1 {
      width: 80px;
  }

  .col2 {
      width: 120px;
      margin-left: 80px;
  }

  #container > div > div {
      line-height: 30px;
      margin: 0 0 17px 0;
      background: #ef631e;
      color: #fff;
  }
以上就是良许教程网为各位朋友分享的Linu系统相关内容。想要了解更多Linux相关知识记得关注公众号“良许Linux”,或扫描下方二维码进行关注,更多干货等着你 !

 微信扫一扫打赏
 支付宝扫一扫打赏

.png)

.jpg)